Friday, February 08, 2019

Sale A Bration 


 I just love this time of year when Sale a Bration (SAB) starts ...... lets face it who doesn't love FREE PRODUCT ....

Place an order for £45 and you get to choose an exclusive FREE product for the SAB booklet .... ALL this can be viewed on line   HERE   and NEW items have just been added including matching dies to the gorgeous stamp sets available

This So Hoppy Together set is so cute  AND FREE  with a qualifying purchase .... for every £45 you spend you get to choose 1 gift,  so stock up on your card colours, DSP, Glues etc and earn free items. Here are the cards we made in my classes using these stamps 


This last card was Cased from the lovely Barbara Meyer .... I just had to recreate it as I loved the whole card 

So why not pop over to the website and have a look and get inspired by the amazing products on offer 

Thanks for stopping by 

Tina 

Saturday, November 24, 2018

Snowflake Christmas Decoration

Simple but Stunning Decoration

Hey thank you so much for joining me today ...

Stampin' Up! have this AMAZING snowflake die set that is available to purchase until the end of November 2018 .... then its GONE .... that makes me so sad as it is just the most stunning set I have ever seen ...
SNOWFALL THINLITS ..... 149692  
You get 20 dies .... which works out to £1.80 per die and as you can see some of them are huge ..... 

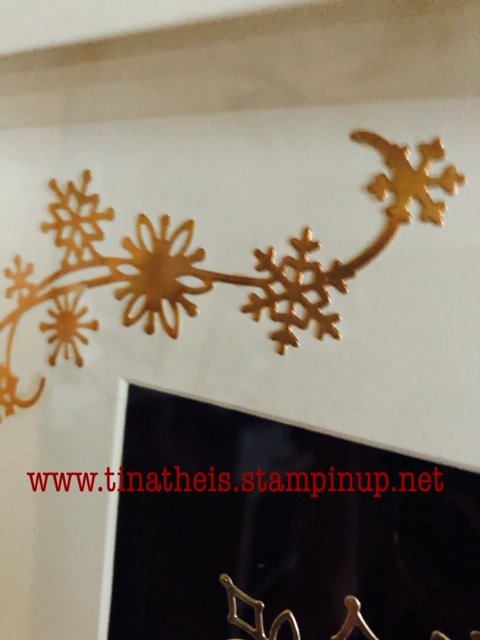
I decided to make a Christmas decoration with mine ....  I used a largish sized box frame from Ikea and used Basic Black card stock behind the square mount .

I cut a selection of the stars out from the Champagne Foil 144748 and the Copper Foil 142020 and WOW they look AMAZING and cut so beautifully. 

I Layered up the snowflakes starting with the largest and used Silicon Glue between each snowflake but don't squash it down flat as you want all the layers to stand out from each other.    When arranging the snowflakes I also decided to alternate the colours rather than sticking to just one,  this was to not only add some colour but it also helped to make each snowflake stand out from the one below.
Then to finish it off I used the snowflake swirl at the top of the frame mount. 


I am so pleased with how it turned out ....   Here is a LINK to the Video TUTORIAL on my youTube channel 
It is such a quick and simple project but is SOOOOOOO stunning ..
LINK to my shop ..... you only have till the end of November to purchase the dies so hurry while stocks last ...
  If you do make one please share it on Social Media and Tag me in it so I can see ..

Many thanks for stopping by 
Tina xxx

Wednesday, November 07, 2018

Christmas Cards 2018 Card 1


Hey everyone, 

Thank you so much for stopping by .....   The card I am sharing today is Card 1 of my Christmas card series for 2018..

For this card you will need .... Whisper White Card stock .... 106549
                                           .... Tufted Embossing Folder .... 146335
                                           .... Black Foil Sheets .....   147898
                                           .... Detailed Deer Thinlits .... 147915
                                          ..... Merry Christmas Thinlits .... 147912


Start by cutting an A4 sheet of Whisper White Card stock in half Portrait ( at 10.5cm or 4 1/8th" ) and score at   15cm or 5 7/8ths".... 

Now cut a piece of the Black Foil Card  14.5cm x 10.3cm or 5 3/4 x 4 1/16"  and put this in your tuffted embossing folder and run through your die cutting machine.

Using Whisper White Card cut out 3 or 4 of the jumping stag and glue them altogether .... Do the same with the word MERRY.

To assemble your card stick the embossed black foil to your card base ( if you want to add a ribbon around the bottom of the card do this to the black foil before gluing to your base card.

Use Silicon glue and put some blobs to the back of your jumping Deer and the Word Merry  and arrange onto your card....

This is such a quick, simple and yet stunning card to make .... 

YOUTUBE TUTORIAL 

Many thanks for stopping by 

Tuesday, September 04, 2018

delightfully Detailed mask

Delightfully Detailed ..... mask

Here is the 2nd part to the blog from yesterday and the YouTube video also from yesterday ....  In fact this was the WHOLE reason I I did the technique in the first place and the Delightfully Detailed Paper which got coated in the STUNNING Silver Embossing powder was just a by product from what I am showing today.     Enough waffle from me .... here is the card
I achieved this effect but firstly coating a piece of card 12cm x 8.5cm with Versamark and then covered that with Stampin' Up! Bronze embossing powder ....... I then repeated this 3 more times so I had a lovely thick base .

Next I taped on my chosen Delightfully detailed small panel with removable tape and inked it up again with Versamark ... I then removed the paper "Mask' and sprinkled on some beautiful dark red embossing powder ....  I heated this up with my heat tool , waited for it to cool then repeated the process with the Mask .... the panel I used was very easy to match up over the already melted red embossing powder .

As the powder starts to melt it sinks into the Bronze and gets like a ceramic tile effect to it ... it is beautiful ...


i then put the card together Using Rich Razzleberry Card and Very Vanilla card stock.
I die cut the "Celebrate' Word from Stampin' Up! 3 times in Very vanilla and once in Rich Razzleberry and glued the VV together right on top of each other then off set the RR so you could see the VV beneath it (as above)

For the centre of the Daisy Punch flower I used a good size blob of Silicon Glue and then covered it with the Metallic Sequins ..

For the full video tutorial CLICK HERE to go to my YouTube video 

Thank you so much for stopping by ,,..... If you would like to receive a free Stampin' Up! catalogue please just message me 

Tina 

Monday, September 03, 2018

Stunning Embossing

Stunning Embossing

Hey my friends 

I have been doing some embossing using my gorgeous Stampin' Up! Copper embossing powder 
  Here is the Card I produced 


this technique is very simple to do .... you basically cover the entire paper with Versamark then cover it with your embossing powder and then heat it ..... I did this 3 times to get a really thick coat onto it 


The flower are from Touches of Texture .... I heat Embossed the back ground colour then stamped over the top and heat embossed the outline with black to make it really stand out ..

I added a strip of ribbon and a sentiment to finish the card off 
..... for the full tutorial please click here to see my YouTube video 

Thank you so much for stopping by 

Tina 


Wednesday, July 11, 2018

Daisy

Daisy

Hey everyone .... After doing my last card I just had to use the Rich Razzleberry again .... especially as it goes so beautifully with the 'Share What You Love' DSP...


I used the Dasiy punch and punched out 3 of the flowers in Rich Razzleberry  and folded the petals in half to give the flower some dimension then stuck all 3 together slightly over lapping the petals to get a full coverage.

I also had some Fresh Fig Ribbon left over so also used that as it really does go nicely with Rich Razzleberry.

I decided to use Mossy Meadow Card stock (133683) as my card base. 

Cut a piece of DSP to 14cm x 9.6cm and adhere this to some Whisper White card 14.5cm x 10cm.  Now wrap your ribbon around the 2 pieces of card about 8.5cm's from the bottom of your card and glue down ...  Stick your flower over the ribbon in the centre.
I used a Tinted Faceted button (146349) in green after tying a piece of bakers twine through the button.

Using some scrap Whisper White card I stamped a Thank You sentiment and mounted this on a scrap of the same DSP and a scrap piece of Rich Razzleberry.  I punched a hole in the top end of this sentiment and tied some white string through the hole.. Use Dimentionals to stick this onto the front of the card under the flower .... Using a Stampin' write pen I did some faux stitching around the sentiment to finish it off .

Hostess Code for July 2018  .... SPF4GVHA

THANKS FOR STOPPING BY 

Tina xxx


Monday, July 09, 2018

TUFTED DYNAMICS


 Tufted Dynamics

OK OK ..... I know I am using the same Embossing folder again .... but come on ..... its GORGEOUS ....

For this card I used the 'Share What You Love ' DSP .... I wasn't sure I actually liked this paper when I saw it in the Catalogue but ordered it as part of the "Paper Share' I ran during June 2018 .... and I am sooooo pleased I did as it really is lovely .... and heavy weight too so great for making 3D projects like boxes or gift bags.


 I used Rich Razzleberry Card stock 119981 for the embossed piece and mounted this on to Whisper White Card base 140490...

For the Sentiment I used the 'Love What You Do' Stamp set 148042
and Heat embossed on to a piece of velum (7.5cm x 5cm)(106584) with the Copper Embossing Powder (141636)  this is another one of my Favourite ...  I cut a piece of DSP (8cm x 5.5cm)and mounted that onto a piece of Rich Razzleberry card (8.3cm x 5.9cm) and mounted that onto a piece of Whisper White (8.7cm x 6.4cm)    I used Dimentionals to stick these mounted mats onto my embossed card .


Then to finish off I used some Nuvo Crystal drops on each of the button pieces to emphasise the Tufted pattern.   This embossing folder really does make a plain card into something a bit special 


Thanks for stopping by 

Tina 

Hostess Code July 2018 ...... SPF4GVHA
If you would like to take part in my July paper share please send me a message 


Blog Archive