Saturday, November 05, 2016

Christmas Decorations 


As many of you know I am a HUGE Christmas fan and I like to make some Decorations every year to display in my home .....  

Here is the 1st I have made (so far.... lol) 

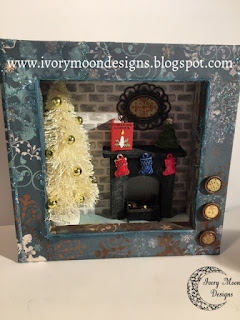
 I bought a small box frame from a Charity Shop for 50p and it had a sprig of Lavender in it .... I took it all apart and cleaned it up then decorated the frame using Bobunny Chrismas paper  ... I adore this paper range .


I made a small fireplace from some scraps of Chipboard then painted it black and dry brushed some white paint on it for a stone effect .

I also made the little firebox from scraps of chipboard too.   I decorated the back of the frame with some Halloween paper from Stampin' Up which is an awesome brick wall effect .... perfect for what i needed .   I got the little white Christmas tree from Tesco in the January sales it was a pack of 4 for £1 .....    I trimmed the back and side of the tree so it would fit into the corner then glued into place. 
  I glued the fireplace to the brick wall.   I took 3 of the little Christmas stocking from Xanderous Crafty Stash and heat embossed them using a few different embossing powders .... Then I decided to do the same to the little Christmas trees as I wanted it for on top of the fireplace .... I was careful to not get any powder onto the little star at the top ....   I found a cameo thing in my stash (Xanderous Crafty Stash do sell these and you can decorate them in anyway you want )  and glued this to the wall.   


I made a tiny Christmas card using a scrap of card and a little punch out which i coloured and Hey presto ...... a cute little Christmas Decoration ...

I would love to know what you think ...... Check out the range of metal embellishments from Xanderous Crafty Stash over on Face book    and The Stampin' Up DSP can be found in my Stampin' up shop ....

Many thanks for stopping by 

Tina xxxx

Tuesday, October 25, 2016

Fernli Designs Design Team make


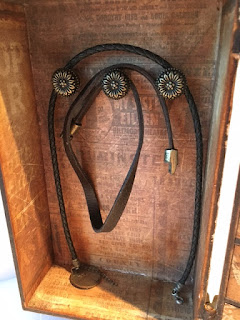
Today i am showing my Design Team Make, which I enjoyed making so so much … My partner is not a girly girly person and I wanted to make her a Cabinet to keep her jewellery in  that would fit her style … Lou sent me this prototype to see what I thought and to see what I could do with it ….. I have to say …. I LOVE IT …. I love how there is space on the other side of the draws so I could put handles on the draws and still be able to shut the cabinet up …


This was a very simple make over … after putting the cabinet together which was very simple I then glued the chosen paper to the outside and sanded it around the edges so it had a smooth edge …. i then inked the edges using Tim Holtz Vintage Photo and Tea Dye.


All the hardware were added once the whole thing had me decorated
the paper I used is a Tim Holtz one but I have lost the front cover so not sure of the name of the collection.  Again it was just a case of gluing the paper to the front of the draws then inking them  …. The Handles are from Xanderous Crafty Stash on Facebook.

With the paper on this side I cut it to fit then inked around the edges before gluing it down as it would be very difficult do do once the paper is in place.    I used some small Handles from my stash to use as hooks to hang necklaces.

All the other Hardware on the cabinet are from Xanderous Crafty Stash ….. Pop along to Fernli and have a look at the amazing items you could alter …. you wont be sorry .

i would love to know what you think  so please leave me a comment below.
Many thanks for stopping by
Hugs Tina

Sunday, October 16, 2016

Xanderous Crafty Stash

Xanderous Crafty Stash & Fernli Designs 


Hello everyone ... Today my post is a joint DT piece for Xanderous Crafty Stash and Fernli Designs...  
I was asked by the lovely Naomi from Xanderous Crafty Stash to join her Design Team for her relatively new company who sell  mainly metal embellishments  and  some acrylic pieces .... but you should defiantly keep an eye on the company as I have it on good authority that some new lines are in the pipe line ...


I decided to use some of the gorgeous Halloween items that are in stock and teamed them up with some of the wonderful items that Fernli Designs sells in their store ....

I started with  a large Oval Plaque  from Fernli, as my base for the Haunted scene
I then decided to use the Tall Bird House as the Haunted house ...
 I painted the base with Black Gesso, then covered the House with some Designer Paper from Stampin' Up  'Halloween Night Speciality'  142022

I inked around the edges with some black ink and cut out some wobbly squares of black card for the Windows and doors and drew roughly with a white pen the frames on the windows .

I decided to use some enamelling powder (by Crafty Notions) to change the metal embellishments .   
Before and after photo ...

 on this skull I used a Blue Pearl WOW embossing powder 

 for the Skeletons Hand  I used Seafoam white from Heat it Up!  I LOVE how the hand turned out ...

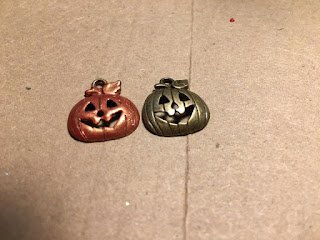
and for the Pumpkins I used Fire Opal Jewel Enamel from Crafty Notions

The Axe is one from my personal stash 
I snipped off the loop at the top of the Skull embellishment and used it to cover the hole in the wooden tag from Fernli Designs ...
 after paining all the wooden pieces black  from Fernli I  dry brushed some white paint on then to get a weathered stone effect  ... the ghost embellishment is from my personal stash 


The metal embellishments from Xanderous Crafty Stash are great to use your embossing powders on and they totally change the look of them .

The lamppost and fence are also from Fernli Designs and the other 'tombstones' are the Domino blanks also from Fernli Designs  .... for the leaves I used a Martha Stewart punch of a maple leaf ... after punching out lots of them and grunging them up by inking them and screwing them up I simply scattered them all over the little scene then picked them up and glued them down a few at a time .. I also added some grey creepy cloth to areas on the scene .

I hope you like what I have done and I would love to hear your thoughts on it ..... and if any of you have a go at doing anything I have covered today .... PLEASE post your photos on the Xanderous Crafty Stash Facebook page or the Fernli Designs Facebook page 

Thanks for stopping by 

Tina xxx


Wednesday, August 17, 2016

STAMPIN' UP CARD


Hello everyone .... Today I am sharing a card I have made using all the latest Stampin' Up products .
i decided to do a centre step card using Whisper White Card Stock


 The Designer paper is 'A Little Foxy' 6 x 6 paper pad .... I inked around the edges using Costal Cabana Ink pad  and Smokey Slate Ink pad and mounted the DP on Basic Grey and Smokey Slate Card Stock.
The flowers are from Blooms & Wishes which I stamped using Costal Cabana Ink pad and stamped the centre of the flowers using Smokey Slate Ink. Then I cut them out free hand and added some glitter to the centre of the flowers .... i love the water colour effect these flowers have .
I added some Lace, Ribbon and Pearls from my stash.     Then I stamped a sentiment from the Floral Phrases stamp set onto Whisper White Card Stock and matted it onto some Basic Grey Card and slipped it behind the lace .

Many thanks for stopping by .... I would love to know what you think .
If you would like to order any of supplies used please contact me 

Tina  xxx

STAMPIN' UP Supplies Used 
Whisper White Card .... 106549
Smokey Slate ....131291
Basic Grey ....121689
'A Little Foxy' DP ....141637
Smokey Slate Ink Pad .... 131179
Costal Cabana .... Retired 
Blooms & Wishes Stamp Set .... 141784
Floral Phrases .... 141767


Wednesday, July 20, 2016

FERNLI WOODEN CHEST 


Hello my lovelies I hope you are all well and enjoying the summer ....

My post today is a Design Team Piece for Fernli Designs  ..... Myself and another DT member decided to make something each from the wooden chest .... as I was putting it together I suddenly saw that the top of the chest would make a great baby cradle ....

So with this idea in my head I decided to do the 2 halfs as a baby gift ... the lid being the cradle and the bottom being something to keep baby lotion, shampoo, cotton wool etc in it ...


I painted the base with a silver metallic paint then added a crackle glaze over the top then applied the top coat of Vanilla Matt Chalk paint  .... i love the effect I got from this   ..... The Heart is the Primitive Heart from Fernli which I covered in glitter ..... 


I would love to know what you think of my make, so please leave a comment below ... many thanks 

Tina xxx

Saturday, May 21, 2016

Photo Albums

Hi everyone ....

I have been making some photo albums ... one is a small one which measures 16 x 10 x 7 cm and is done in the TP style using craft card .


i am selling these ,,,,

Hand Made Photo Albums ... made to order ... personalised with Names and dates .... Made in any colour of your choice ... Contains 5 doubled sided pages .. 3 have pull out tags with more space for photos and journaling ... 2 pages contains a pocket for you to keep some memorabilia (i.e.... movie stubs... love notes, small cards ) holds 20 photos ... measures 16 x 10 x 7 cm

Please contact me if you are interested in ordering any ..

Many thanks 
Tina xx

Sunday, May 01, 2016


Exploding Wedding Card

Today i am sharing a commissioned card I was asked to make for a Friends sons wedding ... which was today ( which is why I can now share it )

I wanted to make something a little special and something that could be also kept as a little keepsake.


The wedding colour was French Blue and they were also having Penguins on top of their wedding cake .

I used Stampin' Up Marina Mist Ink, and the Stamp set was Tiny Tags 


I made the Penguins from Stampin' Up Punch .... Owl Builder  ..... I made 4 of the Penguins and attached them back to back on a piece of Acetate so it doesn't matter which way you have the box opened.

Thank you for stopping by 

If you would like a handcrafted Card or Gift please contact me .

Tina  

Sunday, April 10, 2016

Stampin' Up Card

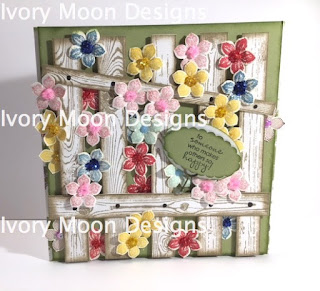
Stampin' Up Fence Card


Hello again 

Today I wanted to show a card I have made using all Stampin' Up products
I have used Whisper White Card Stock for the card base .... And Pear Piizzazz for the background (which I used dimensional on the back to give it some depth.)
I then stamped the Hardwood Stamp (133 035) onto Whisper White card using Crumb Cake Ink and cut it up into strips and inked around the edges with the Crumb Cake ink.

I then stamped out lots and lots of flowers using Petite Petals (133 155) in different coloured inks ....
Real Red
Crushed Curry
Island Indigo
Pool Party
Rich Razzleberry
and punched them all out using the matching punch Petite Petals
I shaped the flowers using a large ball tool and a foam mat.


First of all I glued some flowers onto the Pear Pizzazz card  then used some dimensional foam pads on the backs of 5 of the fence pieces and spaced them out across the card .... then glued down the 2 remaining fence pieces horizontal across the fence pieces as cross bars ... 
I glued down the remaining flowers i had stamped and punched out using silicon glue as I needed to give some of the flowers some height because the fence pieces were raised ... The last thing to do was to add some seed beads to the centre of each flower and stamp out a sentiment from the Petite Pairs (122 497) which I stayed onto the Pear Pizzazz card stock  ... I used the scalloped oval for this and backed that onto the 2" x 13/8" oval on Whisper White card stock ..


Please contact me if you would like to purchase any of the Stampin' Up products i have used.  
Please subscribe to my blog and I'd love to read any messages left 
Many thanks 
Tina xx


Wednesday, April 06, 2016

A thank you gift for our Wedding Photographers 


Hello again crafty friends .... I just wanted to show you the thank you gifts I made for our Wedding Photographers  Mini & Me   

Helen and Dani were wonderful ... they brought so much fun to our day ... they are so friendly yet professional and really put all our guests at easy and we were so lucky to have them shoot our wedding ... we now have 2 life long friends .

I decided that the ONLY thank you gift I could make them were CAMERAS   ..... so I set about designing one for them ...

Here is what I ended up with

The top and base of the camera are made from 2mm thick chipboard and the body is a heavy weight card ... the lens is also made nfrom the same heavy weight card ... to get the different aspects of the lens I simply added strips of card at verious points down the body of the lens .... then added some corrigated cardboard strips for the grip effect ....

I then added some bling around the edges and for the buttons on the top I used Fernli Designs off cuts of circles and a strip of card folded for the flash. 

I designed it so it would open up and would have a mini album inside .. also on the back I added a small metal frame with a photo in the back ..... one of Helen herself and the other of Dani's children ..
 this can be seen in the small photo on the right ..

Then it was time to make the mini albums ... 


I personalised each one for the girls with their inital on a small metal disk ...


I also made each album slightly different so they are both unique .. I also make some tags for the gift boxes with their names on them ... I have to say both girls were thrilled with the name tags lol ... thankfully they were more excited about the cameras lol...


Once I had made the display boxes for the cameras and decorated them I then decorated the bags for them to go in .... 


See middle photo at the bottom ...
I inked  the bag as close to the colour on their business cards I could get ( I used Stampin' Up Bermuda Bay ) then stamped the word MINI & on one bag and ME on the other   ( the reason they are called Mini & Me is very obvious when you meet them ... Helen is very tall and Dani is ... well ..... Pocket sized  ( don't kill me Dani lol) 

I had so much fun making these gifts for the girls and even more pleasure seening their faces when they opened them ...   

Oh and I have the added bonus of the photographs being done by them too  DOUBLE SCORE !!!! 

Thanks for stopping by and dont forget if you are in the Essex/Kent area ..... you cant pick better photoraghpers than MINI & ME 


Blog Archive